

by
Photoshop Editing on Fiverr
October 13, 2017
0
comments
Colour Colour Correction Curves Lightroom Scot Baston Skin Zooming Feet
MULTIMEDIA
PHOTOSHOP
picture editing
Skin tone correction
video editor
Ever hear the phrase “the camera adds ten pounds?” Any number of things can go wrong during a photo shoot and make the subject look heavier than they actually are. Maybe the lighting was off, the angle was bad, or the subject’s posture was unflattering. But there’s a simple way to fix those mistakes and bring out your subject’s natural beauty.There’s nothing we hate more than when designers reinforce unrealistic body expectations by using Photoshop to slim down models until they look nothing like their actual self. In fact, in our countdown of the worst movie posters ever, that was our main beef with the movie poster for “The Heat,” where Melissa McCarthy is slimmed down to the point of being unrecognizable.
The Adobe Photoshop technique we’re about to show you isn’t about giving your subject a skinny body type, and it’s definitely not about turning them into an inhumanly airbrushed, ultra-thin cartoon character. It’s about making them look the way they naturally look under the best possible conditions.

Getting started
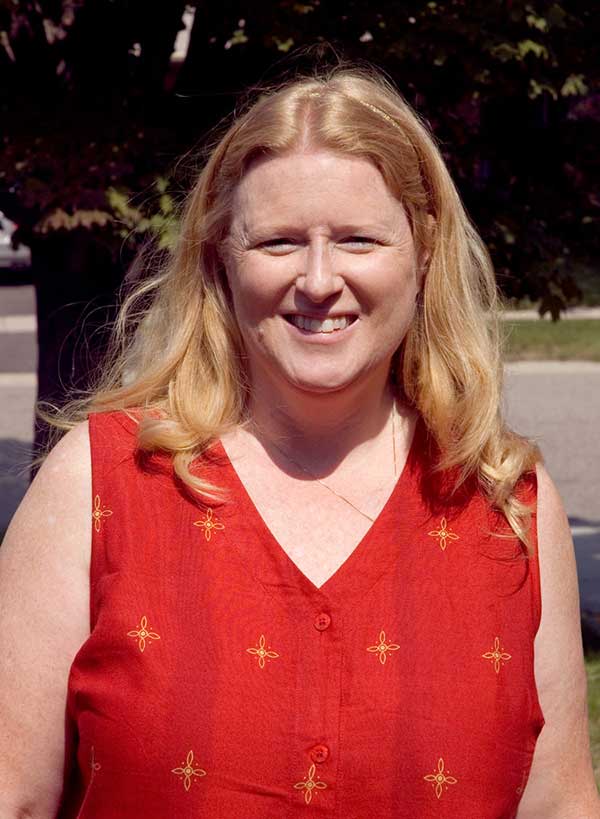 For this tutorial, we’ll be using a photo by photographer Michael Miller that was purposefully shot with harsh, direct midday lighting to show an example of what happens to a model when photographed under these conditions. The model’s face in this picture looks very round and full—but that’s more of a trick of the light than anything.
Since the bright light is directly hitting her face, we’re not seeing any of the normal shadows that would help to define its shape. The light in her eyes is also making her squint, which contributes to her face looking puffy. Our goal is to fix those shadows and give her face some more natural shape and definition.
We encourage you to download the original picture of the model so that you can follow along with the tutorial.
Correcting the head shape
The first thing we’re going to do is reshape the head a bit so that the model’s face is a little slimmer and less full. The oversaturation of the light source in this picture makes the model’s face look bigger than it is, so this process brings back definition. It also helps to correct the unflattering head angle by defining the jawline through the contrast of light.

Open the image in Photoshop and duplicate the layer by clicking Layer>Duplicate Layer (alternatively, you can hit CTRL+J). We’re going to be shaping the head on the duplicate layer, leaving the background layer untouched.
You’ll need the Liquify Tool, so click Filter>Liquify or press Shift+Ctrl+X to bring up the Liquify Tool Options. Set the Liquify Tool size to 50 and pressure to 50, leaving everything else untouched. You’re now ready to start slimming the head.

Begin using the Liquify Tool by clicking and dragging. Make the head thinner, but remember, our goal here is for the model to look more natural, not like someone else entirely. Stay on the subtle side when you start shaping the head. Focus on bringing contrast to the jawline, not reshaping bone structure.

To make sure you’re not being overzealous with the Liquify Tool, keep your cursor on the hair and focus on bringing it to the face. If you go right for the face directly, you’ll end up with one of those creepy pictures that no longer looks like a person.

Go around both sides of the head, pulling hair over to the face until you’re satisfied with the look. As you can see from our example, doing this is going to make the hair look distorted and warped. That’s okay! We’ll correct that in our next step.
Making the hair look natural
For the next step, you’ll be going back and forth between the original background layer and the modified duplicated layer to identify the areas of the hair that have become distorted. Click on the eye icon next to the duplicated layer to turn it on and off.
Wherever the hair is distorted on the duplicate layer, you want to make a selection with the Lasso Tool on the original layer. It doesn’t have to be perfect or neat, it just has to encompass the area that was warped on the duplicate layer. Copy the selection from the original layer and paste it as its own layer above the modified layer.


Now you can turn the modified layer back on to get a feeling of how it’s going to look. As you can see, the copied selection sticks out like a sore thumb, so let’s get rid of that nasty edge.
Bring up the Eraser Tool and set the opacity to 30%. Now you can buff out that ugly edge by rubbing the eraser over it until you get it the way you like it.

Repeat this step over all of the areas of the hair where the modified layer looks a little wonky. When it comes to the areas where the hair drapes across the model’s neck, you might have a hard time getting the hair to line up with the shadows in the picture. Use the Free Transform Tool by pressing CTRL+T or Edit>Free Transform to rotate these pieces so that they look more natural.


You’ll end up with several layers of “hair chunks”—we ended up with three altogether, but you may have more or less; it all depends on what looks the best.

Now let’s help these hair layers gel together (no pun intended.) Hold down the CTRL key and click on the modified layer and any hair layers you created to select them. Click Layer>Duplicate Layer or hit CTRL+J to create duplicates of all these layers at once.

Merge all of these new duplicated layers into one single layer by clicking Layer>Merge Layers or hitting CTRL+E.

Now make a duplicate of this merged layer. We’ll name the first merged layer “Blur” and the duplicate merged layer “Sharp.”

Hide the Sharp layer and select the Blur layer. Click Filter>Blur>Gaussian Blur to bring up the blur settings and set the blur radius to 2.0 pixels.

You should have something that looks like the picture below—the hair meshes together better, but the picture is much too blurry to be professional, so let’s fix that.

Unhide and select the Sharp layer, then click on Filter>Other>High Pass to bring up the High Pass settings, which you want to set at 1.0 pixels.

Now let’s add just the tiniest little blur to this layer by selecting Filter>Blur>Gaussian Blur and set it to 0.3.

The picture is almost completely unrecognizable, but we’ll fix that. Set the Sharp layer’s blending mode to Linear Light from the pulldown menu in the layer toolbar. Now the hair looks a lot more natural.

Cleaning up the neck shadows
Thanks to the bright lighting in our source photo, there are some really dark shadows on the model’s face and neck. These dark shadows make it hard to see the shape of the models face and give it an extra visual weight that isn’t actually there.
Let’s start with the neck, which poses its own unique problem—the shadows on the model’s neck matched the position of her hair. We changed her hair in the last step, so they no longer look correct and they’re adding a lot of unnecessary visual weight to the photo. We’re not going to worry about creating a new shadow that matches the outline of her hair—we’re just going to lighten things up altogether.
Create a new layer by pressing the new layer button, or clicking Layer>New Layer or Shift+CTRL+N. Place the new layer between the Sharp and Blur layers. Hide the Sharp layer so you can see what you’re doing.

To reduce the darkness, we’re going to paint over the shadowed areas with the Brush Tool set to 7% opacity. Press the I button to bring up the Eyedropper Tool and select a color on the skin that’s near the shadowed area, but not actually shadowed.
Go over the shadows with the paint brush, lightening them up and creating a mostly uniform shadow, erasing the curvy shadow lines left by the hair.


You’ll have to keep using the Eyedropper Tool to select different skin tones to work with so that you don’t end up painting the whole thing one color. The shadows should form a gradient from dark at the top of the neck to light at the bottom, like in the photo below.

Now turn the Sharp layer back on, and you’ll notice weird lines left over from where the shadow line used to be.

To erase these leftover lines, we’ll need to use the Clone Stamp Tool. Hold down ALT and right-click on an area as close to the edge as possible. Then wipe the brush over the edge to smudge it out.


You’ll also need to do this to the edges around her chin area to reduce their severity, now that the shadows have been reduced.

Bringing out the cheeks
Since the photo was taken at midday and the sun was bright, the model in the photo has her eyes squinted, causing her cheeks to puff out and create dark shadows on her face. Let’s show what’s underneath all those shadows by brightening things up and reducing the severe lines.

Create a new layer and place it over the last shadow layer, then hide the Sharp layer. Use the same technique as before—set the Brush Tool at 7% opacity and use the eyedropper to select different parts of the skin tone. Go over the shadowed areas on her cheeks (especially where it creases from her smile) and lighten things up to your liking.

Again, you’ll be left with some gross edges on the Sharp layer that you’ll need to get rid of, so make the Sharp layer visible again and pull out the trusty Clone Stamp Tool. Once again, keep the clone area as close to the edges as possible and erase the hard lines around her cheeks.

When you’re finished, you should have an image that’s close to this example.

Lightening the lips and teeth
Now we’re left with one last area underneath her nose where there are some severe shadows. It’s not exactly making her face look fuller, but it sticks out now that the rest of the shadows have been reduced. We’ll have to reduce the shadows, starting with the area directly below the nose and above the lip.
Right now, this area is so dark that it looks like she has a mustache, so create a new layer over the last one and use the same technique as before. This time, it’ll be a little more challenging to get the right color combinations to reduce the shadows, so you’ll have to spend some time playing with it.
Hide the Sharp layer and use the Brush Tool to fill in the shadows with lighter skin tones you’ve plucked off her face with the Eyedropper tool. Once you have those shadows reduced, switch back to the Sharp layer and use the Clone Stamp Tool to erase the severe lines.

Once again, hide the Sharp layer and create a new layer underneath it for the lips and teeth, which now looks sort of bruised and stained since the shadows are too dark. Repeat the same steps as before—pull colors with the Eyedropper Tool, reduce the shadows with the Brush Tool, and then turn on the Sharp layer so you can reduce the severe lines with the Clone Stamp Tool.

Do things one section at a time. Start with the top lip, then do the teeth, then the bottom lip. In between each one, switch back to the Sharp layer so that you can erase the harsh lines with the Clone Stamp Tool. Keep repeating these steps, one section at a time, until you’ve got the right balance of shadow that looks good. Your end result should look something like the image below.

Adding shadow for depth
Adding some light was good, but it looks a little unrealistic now that there are no shadows at all on the model’s face. You’ve spent a lot of time taking the shadows out of the image, but now we’re going to add some.
Create a new layer underneath the Sharp layer. Use the Eyedropper Tool to select a dark color from the shadows between the model’s face and hair. This is going to be the color you use overall for the shadows, so don’t pick anything too dark or too light; aim for right down the middle.

Set the Brush Tool to 30% opacity and draw a rough shadow along the left side of the model’s face, underneath her chin and jawline, and down the left side of her neckline.

Once you have the shadows the way you want them, change the layer’s blending mode to Darker Color in the drop-down menu and set the opacity to 40%.

Now the shadows look more natural and less severe, and the model’s face looks the best it can be without being unrealistic.

If you’ve followed these steps correctly, you should have an image that looks like this:

Don’t rely on Photoshop too much
Remember that retouching a photograph to correct unflattering lighting is no substitute for taking a good photograph, to begin with. Don’t use these Photoshop effects as a crutch; whenever possible, try to get ahold of a photo that makes your subject look their best from the get-go.
Be sure to leave us a comment below with your results from the tutorial or any other images to which you’ve applied these techniques!
Don`t neglect your friends, share this right away.


0 comments:
Post a Comment